
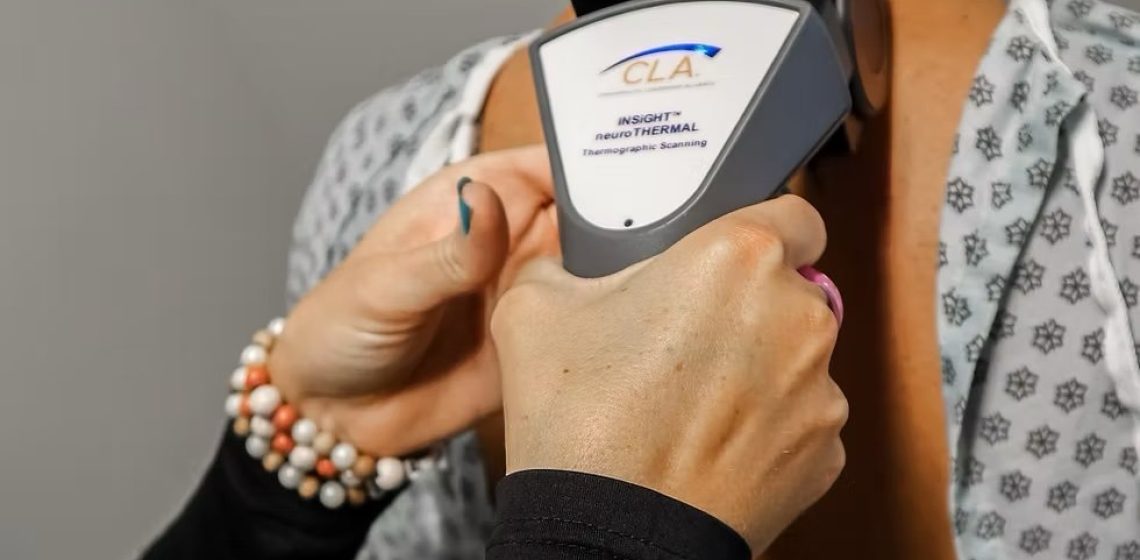
You’ve just had your digital spinal scan at our Sydney CBD studio, and now you’re holding a report filled with colours, graphs, and a number called your “Core Score.” It can feel a little overwhelming. You might be wondering, “What does this actually tell me about my health?” or feeling anxious about a score that seems low.
First, take a deep breath. This report is not a judgment or a diagnosis of disease. Instead, think of it as the first clear, objective window into how your nervous system is functioning. It’s a detailed map that shows us precisely how your body is adapting to the stresses of daily life, from long hours at your desk to your sleep quality and physical activity.
This guide is designed to give you a plain-English explanation of your results. We’ll walk you through what each number, colour, and graph means, helping you understand the connection between your nervous system’s efficiency and your journey toward lasting health. Your Core Score is a powerful tool, and our goal is to empower you with the knowledge to use it effectively.
What is a Core Score in Chiropractic Care?
Before we dive into the details of your personal report, it’s important to understand what a Core Score is and, just as importantly, what it isn’t. Many people see numbers and graphs and immediately think of a traditional medical test, but this scan offers a different kind of insight.
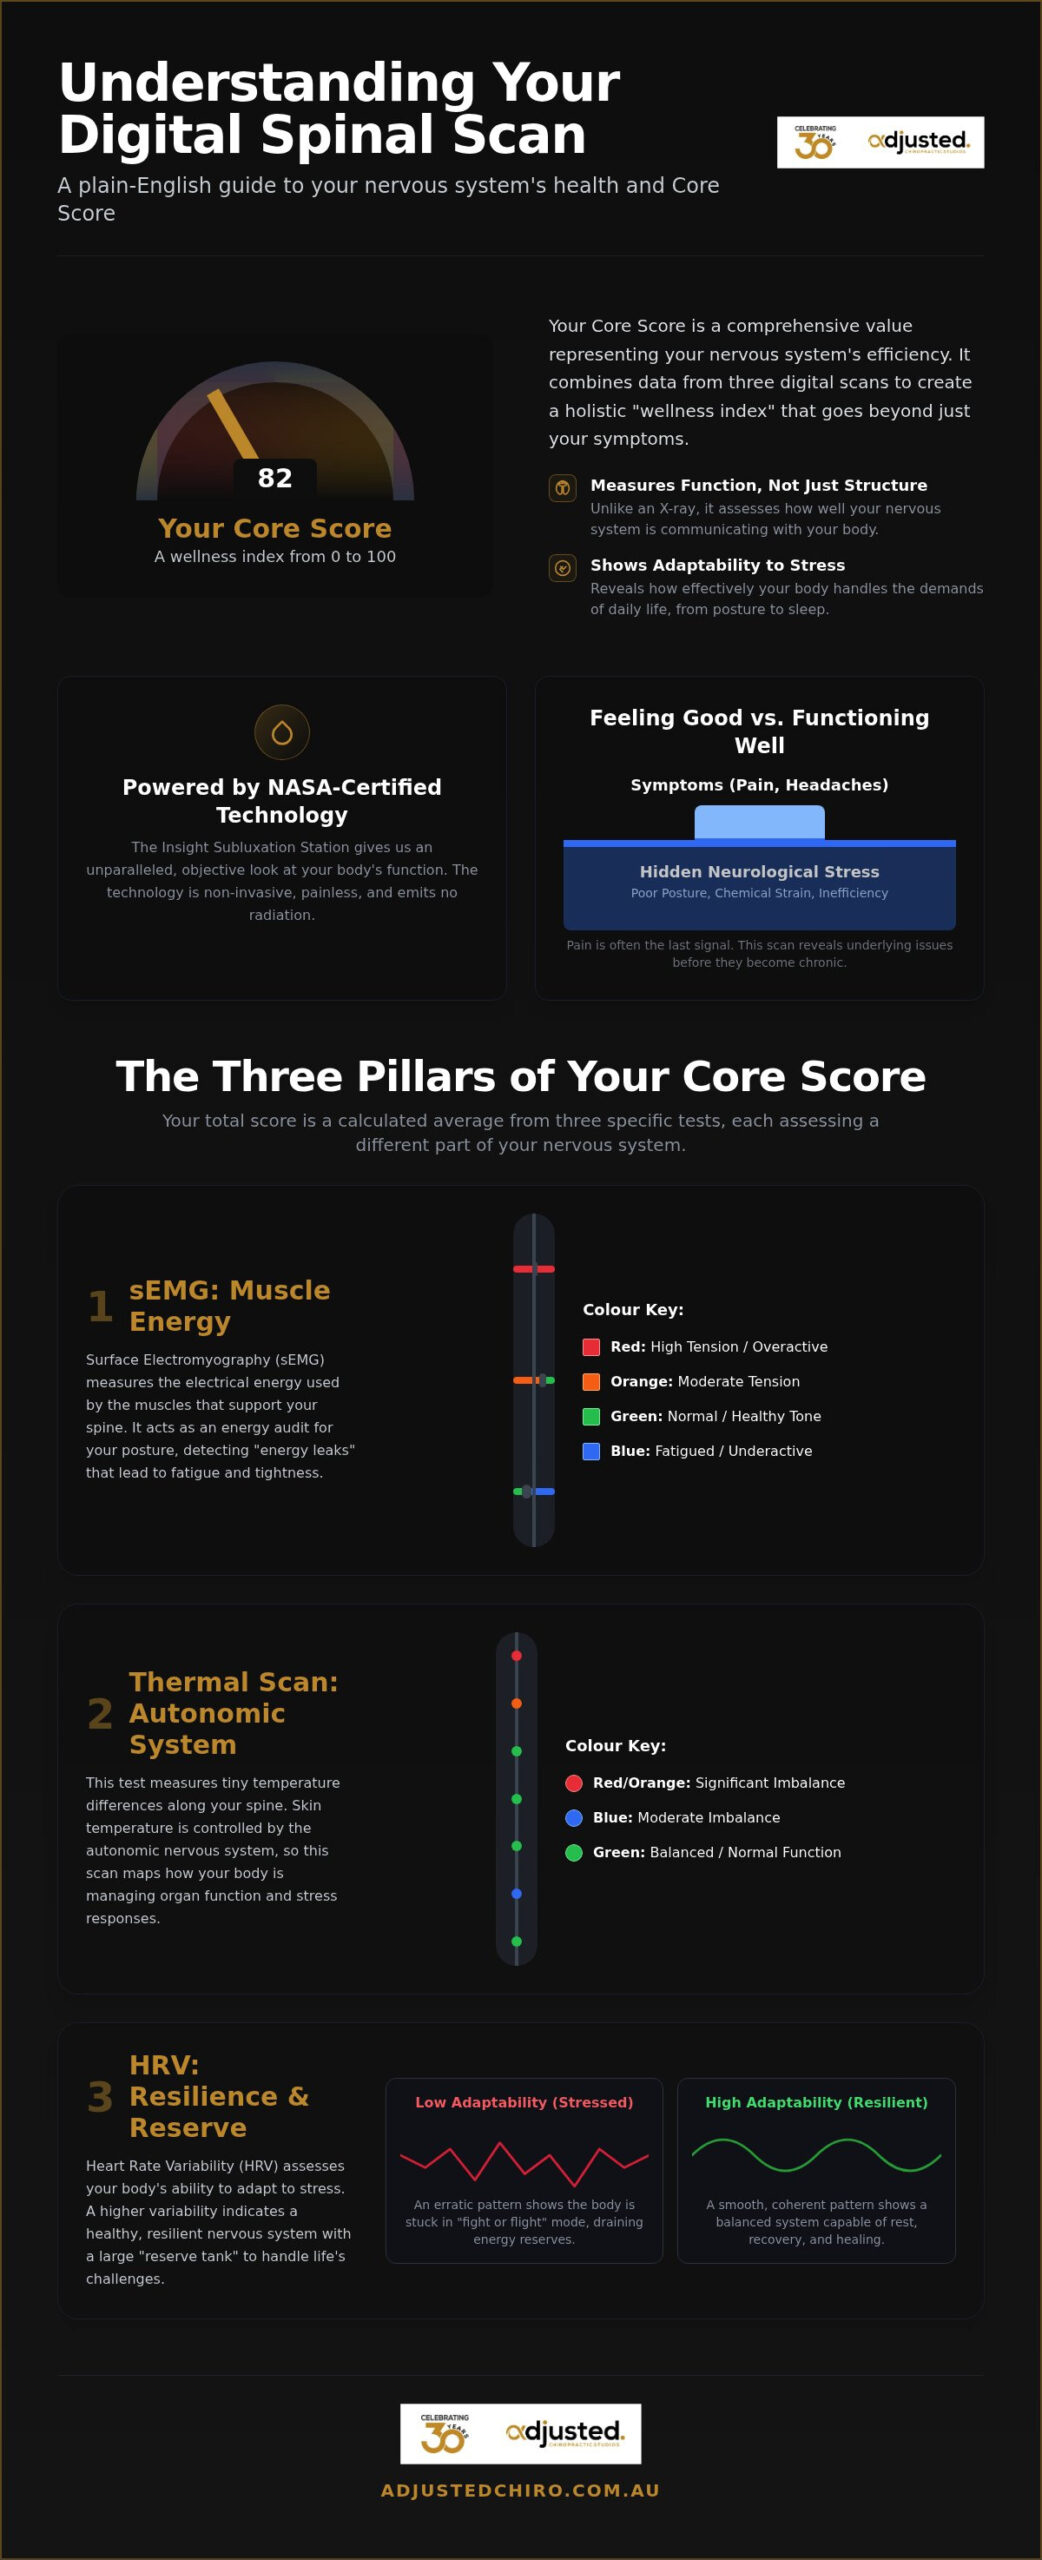
- A Core Score is a comprehensive numerical value, typically from 0 to 100, that represents the overall efficiency and adaptability of your central nervous system.
- It combines objective data from three distinct, non-invasive digital scans to create a holistic “wellness index” that goes beyond just your symptoms.
- Unlike an X-ray or MRI which examines the structure of your bones and tissues, the Core Score technology focuses on function—how well your nervous system is communicating with your body and managing stress.
In essence, your Core Score is a holistic metric of your neurological adaptability, showing how well your body can handle the demands placed upon it. It provides a baseline from which we can measure genuine progress in your health, moving beyond simply whether you feel pain on any given day.
The Technology Behind the Scan
The credibility of your Core Score results is grounded in sophisticated, reliable technology. The Insight Subluxation Station, which we use to generate your report, was developed in conjunction with NASA to measure the effects of space travel on astronauts’ spines and nervous systems. This NASA-certified technology gives us an unparalleled, objective look at your body’s function.
The scanning process is completely non-invasive, painless, and emits no radiation, making it safe for everyone, including children and pregnant women. At our Sydney CBD studio on Henger Street, we rely on this digital scanning as a cornerstone of our investigative approach. It allows Dr. Adrian Couzner to move beyond guesswork and gather concrete data, ensuring your care plan is tailored precisely to what your nervous system needs.
Nervous System vs. Spinal Pain
One of the most common questions we hear is, “Why is my score low if I don’t have much back pain?” This highlights a critical distinction in modern chiropractic care: the difference between “feeling good” and “functioning well.”
Your nervous system is the master control system of your body. It can be under significant stress—compensating for poor posture, emotional strain, or chemical imbalances—long before a symptom like pain or headaches appears. Pain is often the last signal that something is wrong, like a smoke alarm that only goes off when the fire is already well-established.
The Core Score scan is designed to detect this “hidden” neurological stress. It identifies areas of inefficiency and interference (what chiropractors call subluxations) before they escalate into chronic issues. A low score doesn’t necessarily mean you’re unwell, but it does indicate that your body is expending an excessive amount of energy just to maintain its current state, leaving you with fewer reserves to heal, adapt, and thrive.
The Three Pillars of Your Core Score Results
Your total Core Score is not just a single measurement; it’s a carefully calculated average derived from three specific tests. Each test, or “pillar,” assesses a different aspect of your nervous system, and together they provide a comprehensive picture of your spinal health. Understanding these three components is key to understanding your overall result.
Dr. Couzner analyses these pillars to create your personalised care plan. He knows that achieving a balance between these three systems is often more important for long-term wellness than having one perfect individual score. Let’s break down what each scan measures and what your results look like.
sEMG: Measuring Your Muscle Energy
The first pillar is Surface Electromyography, or sEMG. This scan measures the amount of electrical energy being used by the muscles that support your spine. Think of it as an energy audit for your posture.
Your postural muscles should be working efficiently, like a well-tuned car engine idling smoothly. However, if your nervous system is stressed, these muscles can become overworked, constantly firing and burning precious energy. The sEMG scan detects these “energy leaks,” which often lead to fatigue, muscle tightness, and postural issues.
[Image: An example of an sEMG scan report, showing coloured bars along a spinal column, with some bars in the red or orange indicating high muscle tension.]
On your report, you will see a graph of your spine with coloured bars extending outwards. The length and colour of these bars indicate the level of muscle activity:
- Green bars represent normal, healthy muscle tone.
- Blue or Waxy bars show muscles that are underactive or fatigued.
- Orange and Red bars signify high levels of muscle tension, where your body is consuming excessive energy just to stay upright.
For many of our Sydney office workers, we frequently see high tension (red bars) in the neck and upper shoulders, a direct result of the “tech neck” posture associated with prolonged computer use. You can learn more about correcting this in our guide to mastering workplace posture.
Thermography: Mapping Your Autonomic System
The second pillar is Thermal Scanning. This test measures tiny temperature differences along your spine. While it may seem unusual, the temperature of your skin is controlled by a part of your nervous system called the Autonomic Nervous System (ANS).
The ANS acts as your body’s internal autopilot, regulating everything from your heart rate and breathing to your digestion and immune response. When there is interference in the communication between your brain and your body along the spine, it can disrupt blood flow and cause the skin’s temperature to change. A balanced, symmetrical temperature pattern indicates a healthy, well-regulated autonomic system.
[Image: A sample thermography scan result, displaying a spinal column with coloured lines on either side, highlighting temperature imbalances between the left and right sides.]
Your thermography report shows a graph of your spine with coloured lines. The colours represent the degree of temperature deviation from normal:
- White lines indicate a normal, balanced reading.
- Green, blue, and red lines show progressively larger temperature imbalances.
Significant imbalances suggest that your autonomic system is struggling to maintain proper control over your internal organs and glands, which can be a precursor to a wide range of health issues.
HRV: Your Stress Adaptability
The third and perhaps most critical pillar is Heart Rate Variability (HRV). This test measures your body’s ability to adapt to stress. It doesn’t just look at your heart rate, but at the tiny variations in time between each heartbeat.
A healthy, adaptable nervous system results in high variability, showing that your body can easily shift gears between a “fight-or-flight” stress response (sympathetic) and a “rest-and-digest” healing state (parasympathetic). Low HRV indicates that your body is “stuck” in a stress pattern, draining your internal “Organ Reserve” and making you more susceptible to illness, fatigue, and burnout.
[Image: A visual representation of an HRV scan result, showing a dot on a graph with axes for ‘Sympathetic’ and ‘Parasympathetic’ tone, indicating the patient’s adaptability to stress.]
Your HRV result is typically displayed as a dot within a rectangular graph. The position of this dot tells us how well you are adapting:
- Inside the box (the “Zone of Adaptability”): Your body is bouncing back well from the stresses of work, poor sleep, or exercise.
- Outside the box: Your nervous system is either in a state of exhaustion or over-arousal, indicating poor adaptability.
HRV is widely considered a key predictor of long-term health and longevity, and improving this score is a primary focus of our corrective care plans.
Decoding the Colours: What Red, Orange, and Green Mean
The colours on your Core Score report provide a quick, intuitive way to understand your results. We use a simple “Traffic Light” system to represent the intensity of neurological stress detected by the scans.
- White/Green: This is the “go” signal. It indicates areas that are within normal, healthy limits. Your nervous system is functioning efficiently and adapting well to stress in these regions.
- Blue/Waxy: This is a “caution” signal. It signifies mild to moderate levels of stress. Your body is beginning to compensate for some underlying interference, and these are areas that require attention.
- Orange/Red: This is the “stop and look” signal. It highlights areas of high neurological interference, muscle tension, or autonomic imbalance. These parts of your system are working too hard or are in a state of exhaustion.
It’s crucial to understand that seeing “red” on your scan is not a reason to panic. It is simply a clear, objective signal that your body is under significant stress and that this is an area we need to prioritise in your care. It provides a precise starting point for your journey back to health.
Understanding Pattern vs. Intensity
While the intensity of the colour is important, the pattern of the findings is often even more significant. During your report of findings, Dr. Couzner will look at two key aspects: distribution and symmetry.
Is the stress concentrated in one specific area, like your lower back, or is it spread throughout your entire spine? A widespread pattern can suggest systemic stress, while a concentrated pattern points to a more localised issue. Furthermore, an asymmetrical pattern—where one side of your spine shows significantly more stress than the other—is often a key indicator of underlying spinal misalignments (subluxations) that need to be addressed.
As part of your initial care plan, we track the changes in these patterns over your first 12 sessions. Our goal is to see not just a reduction in red and orange, but also a more balanced and symmetrical pattern emerging as your nervous system begins to function more efficiently.
The Neural Efficiency Score
Finally, all this data is compiled into your overall Neural Efficiency Score, the number from 0-100. This number represents how efficiently your nervous system is performing, given your age and the demands placed upon it.
It’s important not to get too fixated on this single number. A perfect score of 100 isn’t the goal for everyone; the primary objective is improvement. A rising score over time is objective proof that your body is healing and becoming more adaptable. We compare your score to age-matched healthy benchmarks to give you a realistic perspective on your current state and to set achievable goals for your care.
Why Your Results Matter for Long-Term Wellness
Your initial scan serves as a vital baseline. It allows us to measure your actual, objective progress over time. Feeling better is a wonderful and important outcome, but seeing the data on your re-scans improve provides concrete evidence that your nervous system function is being restored. This evidence-based approach ensures your care is both effective and efficient, taking the guesswork out of your health journey.
The lifestyle factors of living and working in the Sydney CBD—from long commutes to high-pressure jobs—have a direct and measurable impact on your score, which is why a localised, data-driven approach is so effective.
The Impact of “Tech Neck” and Sedentary Work
At our clinic, we see specific neurological patterns common among Sydney CBD professionals and desk workers. Hours spent hunched over a keyboard or looking down at a phone place enormous strain on the upper cervical spine, leading to distinct patterns on the sEMG scan. This chronic postural stress effectively “drains” your nervous system’s battery, which is often reflected in a lower HRV score.
The good news is that this data empowers us to give you targeted advice. While chiropractic adjustments are central to correcting these patterns, we can also recommend small lifestyle changes to support your progress. Simple actions, like setting a timer to stand up and stretch every 30 minutes or adjusting your monitor height, can significantly improve your next scan result. For professionals seeking lasting relief, our expert spinal care for adults is designed to counteract the specific demands of a corporate environment.
Customising Your Adjustments
Your Core Score results are the blueprint Dr. Couzner uses to design your unique care plan. The data tells him not only where to adjust but also how. For example, the approach for a nervous system that is “over-aroused” (stuck in a high-stress state) is very different from one that is “exhausted” (showing low energy and fatigue).
This level of precision allows for highly effective and gentle spinal adjustments. The frequency of your visits is also determined by this data, ensuring you receive the exact amount of care you need to make consistent progress. The re-scan is a critical part of this process. It’s our way of proving that your care is working and allows us to celebrate your health victories together as your scores improve.
Personalised Care at Adjusted Chiropractic Studios
With over 30 years of experience helping Sydney-siders achieve better spinal health, we have always been committed to providing care that is both compassionate and effective. Our investment in Core Score technology stems from this commitment to evidence-based solutions. We believe you deserve to see objective proof that your health is improving.
Our approach is that of a “wise mentor.” We don’t just give you a score; we take the time to sit down with you and explain your results thoroughly, ensuring you feel understood, informed, and empowered. We want you to be an active partner in your health journey, and that starts with understanding.
To begin this process, you can book your initial health evaluation and scan at our centrally located Sydney CBD studio.
Your Journey Beyond the Scan
Your Core Score is the starting point, not the destination. During your report of findings session, Dr. Couzner will explain what your results mean in the context of your personal health goals. He will then outline a clear, structured care plan designed to get your nervous system functioning at its best.
Take the First Step Toward a Higher Score
Are you ready to move beyond symptoms and gain a true understanding of your body’s potential? Your nervous system is the key to your overall health, and now is the best time to see how efficiently it’s running. Organise a consultation at our Henger Street studio and discover what your numbers have to say.
Book your health evaluation and Core Score scan today and take the first definitive step toward a more resilient, adaptable, and healthier you.
Frequently Asked Questions
-
Is the Core Score scan the same as an MRI or X-ray?
No, they are fundamentally different. X-rays and MRIs are static tests that look at the structure of your body, such as bones, discs, and soft tissues. The Core Score scan is a functional test that measures how your nervous system is operating and adapting to stress. They provide complementary information, but the Core Score focuses on function, not just anatomy.
-
Does a low Core Score mean I have a serious medical condition?
Not at all. A low Core Score is not a diagnosis of a disease. It is an indicator of poor neurological efficiency and adaptability. It signals that your body is under a significant amount of stress and is not functioning optimally, which, if left unaddressed, could lead to chronic health issues over time. It’s a valuable early warning sign.
-
How often should I have a re-scan to check my progress?
We typically perform a progress re-scan after an initial block of care, often around 12 visits. This gives your body enough time to respond to adjustments and make measurable neurological changes. The timing can vary based on your individual case, and Dr. Couzner will recommend the ideal schedule for you.
-
Can children have a Core Score scan at your Sydney clinic?
Yes, absolutely. The technology is non-invasive and completely safe for all ages. Scanning children is a wonderful proactive measure, as it can help identify underlying neurological stress from birth trauma or developmental challenges before they become significant issues later in life.
-
Will my health insurance cover the cost of the scan and evaluation?
Many private health insurance plans in Australia with “extras” cover for chiropractic care will contribute to the cost of your initial consultation and scan. The amount of coverage varies between funds and policies. We can provide you with the necessary codes and receipts to make a claim with your provider.
-
Why did my score go down even though I feel better?
This is an excellent question that highlights the difference between feeling and function. Sometimes, as your body begins to heal and “unwind” deep-seated stress patterns, it enters a phase of re-organisation. This can temporarily show up as increased activity or imbalance on a scan, even as your symptoms are improving. It’s often a sign that the body is actively working to correct long-standing problems, which is a positive step in the healing process.
-
How long does the actual scanning process take during my appointment?
The three scans are very quick and straightforward. The entire process typically takes only 10-15 minutes to complete. It is a seamless part of your comprehensive initial health evaluation.
-
Do I need to do anything special to prepare for my scan?
There are no major preparations required. We recommend being well-hydrated and wearing comfortable, loose clothing if possible. It’s also best to avoid strenuous exercise or drinking caffeine immediately before your appointment, as these can temporarily influence the scan results.